Thursday, December 15, 2011

North Carolina Virtual Public School (NCVPS) Help Center


The North Carolina Virtual Public School has a help center to support students taking NCVPS courses with technical issues. The main issue that comes to mind is students who have forgotten their Blackboard password. The Distance Learning Advisors of the schools and the District Distance Learning Coordinator can look up the students password only if they have not changed it from the original password given to them by NCVPS. If the student has changed their password, the change is not reflected in the student information. They would need to contact the NCVPS Help Center. The hours of operation for the Help Center are 8am-4pm, Mondays - Fridays except for state holidays. There are two ways to contact the Help Desk. The first method, and their preferred method is to submit an online ticket. Their address is http://www.help.ncvps.org/. Students will need a valid email address as the solution will be emailed to them. The second method is to call them at 919-480-8770 and leave a voice message. They will get back to the student via email in 1 business day. Return phone calls won’t happen unless there is a time sensitive need to acquire further information to solve the student's problem.
The NCVPS Help Center services all people involved with The North Carolina Virtual Public School. Their services are not just limited to the students. The Distance Learning Advisors of the schools, The NCVPS Instructors, the Peer Tutors and the District Distance Learning Coordinators (LEA’s) can contact the Help Desk for technical issues.

Thursday, November 17, 2011

Importing Lessons or Tests from Other Databases

It’s a good idea to create and share tests among co-workers. Why should each teacher create their own work and not share it with others. This is very easy to do in CPS. However, be sure you are working from your single database and share it with one shared database. If you are working with too many databases, you will start to get confused and loose tests. Remember, it’s best to keep your database on the C drive of your computer. The shared database can be stored on a school file server or in the cloud somewhere that all teachers involved has access to. When you import the tests to your database or the shared database, it works best if you copy the shared database to your C drive. Just remember to keep the shared database on the file server (or cloud) current.
Be sure the CPS version you are using is at least 6.70. It is also very important that everyone who is sharing items all have the same version of CPS.
So let’s say someone has imported a test to the shared database and you want to add it to your CPS database. Open your database and click on the “prepare” tab and “lessons and assessments” sub tab. Click “import”. Select the shared database that you copied to your C drive. Click on the plus sign to the left of the shared database name. You will see all the lessons or tests in that database. Put a check in the tests you want to import and click “ok”. You will see the test you imported at the bottom of the list.


Friday, October 21, 2011

Animal Flash Drives

Sure, you can buy the normal looking flash drive, but Staples has animal shaped flash drives available. They have a cow, Nemo clown fish, monkey, mouse, panda bear, pink pig, hippo, sea turtle, and penguin shaped flash drives. They are all 4GB USB 2.0 flash drives and they cost $9.99 except for the penquin and the hippo which costs $19.99. I’m not sure why there is such a difference in price. Just for the record, I did not buy one of these for myself. It would be cool if your school mascot was one of these animals. Of course I really don’t see a mouse as a formidable opponent as a sports team, but to each their own. They do have some thickness so if your USB port is recessed in the computer, you may have some difficulty pushing it in. However, if you do have problems, you can use a short USB cord. I just thought I would pass this information on.

Thursday, October 20, 2011

Adding a PowerPoint File In a CPS Test

A lot of teachers use PowerPoint. For those PowerPoint users that also use CPS, I just wanted to let you know that you can create a test in CPS (CPS calls them lessons). It’s very simple. Click on the “prepare” tab and the “lessons & assessments” sub-tab. Click the new button and choose “lesson”. Name the test and click “ok”. Click on the name of the test and choose “PowerPoint File” from the “add file(s)” drop down.


Navigate to and open the PowerPoint presentation you want to add to the test. Now click the “engage” tab and the “lessons & assessments” sub-tab. Place a check in the box to the left of the PowerPoint test you just created and click “engage”. Your PowerPoint file will open and the CPS program will scan for your receiver. The type of test will look very much like a “verbal engage”. You will be able to advance the slides or for that matter right click and go to a previous slide or any slide. Click the verbal button to choose the type of question you want. Remember, a verbal engage starts right away. I hope that helps.

Friday, October 14, 2011

Create a Comic Strip or a Comic Book

Comic strips are a good activity for students. They allow teachers to see if students understand the concepts taught in class. They also allow the students to show their creative side while having fun at the same time. The sites allow you to drag and drop characters, backgrounds, dialog boxes and add your text. They are very easy to manipulate. Here are 4 comic strip sites that are free and school friendly.


Superherosquad.marvel.com allows you to drag and drop super heroes (as the site name implies). This site also gives you the option to create a comic book. Pikikids.com gives you the option to upload your own photographs. The students could use their phones to take the pictures. The photography teacher in me advises you to teach your students about composition and lighting before you send your students out on their photo excursion. Makebeliefscomix.com allows the user to write the comic strip in English, Spanish, French, German, Italian, Portuguese or Latin. Pixton.com has a link for schools.

No matter what subject you teach, these comic strip sites give you the opportunity to assign a fun activity to your students.

Thursday, October 13, 2011

Shodor.org\Interactivate is a Great Resource for Math and Science

http://www.shodor.org/interactivate/ is a great resource for Math and Science. It is a java based Math & Science courseware that includes lessons, discussions and standards for the teachers and activities, tools and a dictionary for the students. Shodor contains over 70 lessons based on the activities for grades 3-5, 6-8 and 9-12. The discussions will help the students understand math and science concepts. There are over 100 interactive activities that allow students to explore the many areas of math and science. The dictionary lists the terms the students encounter in the website. The tools are a subset of the activities index page and can be used as stand alone applications in analyzing numbers and data.

Polar Coordinates Activity

Friday, September 16, 2011

New Year, New CPS Database

When you begin using CPS another school year you should create a new database. I tell teachers it’s not a bad idea to name your new database your name and the school year. So for example, I would name my database Brian_2011_12. For those of you that are new to this CPS database deal, let me explain what a database is. You create a CPS database the very first time you open CPS. You only create one for the entire school year. This database contains all the classes, students, lessons (or tests), fastgrade test keys and challenge boards you create during the entire year. That way you can easily see when the databases were created. You should never delete your old databases. This is so you do not have to create all your lessons, fastgrade tests and challenge boards all over again. That would be a bit insane.


Once you create your new database, click on the “prepare” tab and the “lessons & assessments sub-tab”. Click the import button. Click the browse button to browse for your database. In the next window, you will see your selected database. Click the plus sign next to the database name and put a check in the lesson (test) boxes you want to import.

Tuesday, August 16, 2011

Completing The Quest Atlantis Student Consent Forms Online

You no longer have to print out the student consent forms and have the students and parents sign them. Students and parents can now complete their consent forms online. However, teachers will still need to complete their forms on paper. Here is the procedure for completing the student online forms.

1. Go to your teacher toolkit -> My Questers -> Registration and Class Lists.

2. Expand your current class to see mail envelopes in the Consent – Teacher column. Click on the mail envelope to generate an email to parents.


3. The mail envelope will generate an email for one student at a time. You will see a screen reminding you that your account will be documented as sending out consent emails. Click “proceed”. Feel free to edit the letter as you see fit, but make sure you keep the hyperlinks and access codes as they are. Enter the parent’s email address for the child. When you send the email, a copy of the email will be saved in this same location.


4. Parents will receive the email. When they click on the "complete the consent process" link, they will open a window prompting them to enter the child’s last name. QA  does not have a way to find "close matches" so please make sure all students’ names are spelled correctly.

5. Parents complete their information at the top. As they scroll down, they will see the IRB-approved consent form. There are different language options available.

6. Parents are then given a check box certifying that they agree to allow their child to participate.

7. Students will need to check the final box labeled (Student’s name) consent.

8. After the process is complete, students will be automatically entered into the system and their accounts will be activated. You will not need to collect and/or submit any forms to QA. The forms will be saved electronically.

9. Parents have the option to retrieve this email at a later date to remove consent if they no longer want their child to participate. You will also have the ability to remove consent should a parent indicate that they do not want their child to participate any longer.

Once a parent completes the form, the student is automatically activated in the Quest Atlantis system. In addition, you can see this file in your Teacher Toolkit and you can confirm the date of the submission at any time. Also, parents can easily see the consent form in other languages if needed. You can still have the option to send in the paper consent forms. Just remember that the same rules still apply. By checking the Consent – Teacher box you are providing your legal, electronic signature that you have the completed consent form. We still need a signature from both the parent and the child on each form, and they must be returned within 60 days.

Wednesday, June 22, 2011

Creating and Engaging CPS Performance Questions


A performance question is an open-ended or subjective question that requires a specific response, usually in the form of short answer or essay. A rubric is a tool associated with a performance question that allows the instructor to divide the total number of points available for that question into distinct categories. For example, the points for a 10-point essay question could be divided into four categories worth 2.5 points each: grammar, punctuation, content, and persuasiveness. A rubric can not be used to give additional weight to a specific question. The student has a maximum of 140 characters for their answer.

The first step to setting up a performance question is to decide how many categories there should be and what those categories should be titled. Once you know that, it's time to create the rubric to show those categories. To create a new rubric, follow these directions:
• Click the settings menu.
• Select performance question rubric wizard. The CPS performance question wizard appears.
• Check the create new rubric box, in the new rubric section. (Note: This option does not appear if this is the first rubric created in the database.)
• Click next to continue.
• On the next screen, fill in the rubric name box.
• Choose the number of categories from the total number of categories pull-down menu.
• Click next to continue.
• Type in the names of your categories, or leave the default names.
• Click next to continue.
• Verify that the information you previously entered is correct. Click back to edit the information or next to save the information.
• On the final screen, click done to save your rubric and return to the prepare - lessons and assessments tab.

Once you have created your rubric, you are ready to create the performance question to go with it:
• From the question author window, select performance question from the top drop-down box in the format section.
• Select the rubric you want to associate with this question.
• Save the question by clicking either the save button or the save and next button.

Performance questions and their associated rubrics can also be added from within the fastgrade window.
• In the performance section of the fastgrade window, click the rubric button to create a new rubric to associate to your question or select an existing rubric from the drop-down list.
• With the rubric selected, click the add button to add the question with its associated rubric.

If you need to edit a rubric after you have created it, you can do so from the performance question rubric wizard:
• Click the settings menu.
• Select performance question rubric wizard.
• Select the rubric you want to edit from the list of existing rubrics in the existing rubrics section.
• Click the radio button next to the edit option.
• Click next to continue.
• Edit the rubric name and/or total number of categories (from 1 to 25).
• Click next to continue.
• Edit any of the category names.
• Click next to continue.
• Verify that your rubric information is correct: click back to change the information or next to continue.
• Click done to save your rubric.

Once you have created your rubric, it's time to use it. To do so, simply make sure that at least one person gives a response for the rubric question as the session is being administered. As with all CPS questions, the performance question must be started, and at least one response must be registered for the question. If no responses are recorded, the question is automatically excluded from the session report and the grading calculations.

The assigning of points for performance questions happens after the session has ended:
• From the reports section of the report tab, select the session containing the performance question you want to grade and click the edit button.
• From the assessment options window, click the re-grade students button.
• In the re-grade window, you will see that instead of the standard checkbox, the performance question will have multiple columns, and those columns will have numeric values. When you have entered values for each of the students, click ok to return to the assessment options window and then click ok again to return to the reports tab.

"Photo Editing on the Web" Workshop


I did a “Photo Editing on the Web” workshop this past Friday. It was part of a two day series of new workshops we did for the teachers of the Winston Salem Forsyth County School District. It also gave me the opportunity to revisit a passion of my past that I don’t utilize as much any more. Photography is a part of our everyday lives and also is used when teachers create content for their teacher web pages. During the training I took the teachers to 3 free web-based photo editing sites. All 3 sites offer users the ability to edit their images in a variety of ways. Picnik http://www.picnik.com/ present users editing features but list several of their capabilities as premium, in which the user must pay to use. FotoFlexer http://fotoflexer.com/ offers users several nice features. However, my favorite of the 3 is Pixlr http://pixlr.com/editor/ This site looks and works like a version of Photoshop somewhere between Photoshop Elements and the full version of the program.
During the workshop the teachers edited their images in a variety of ways including cropping, resizing, dodging (lightening a specific area of the image), blurring (removing wrinkles in the faces of people to make them happy), adjusting brightness & contrast using levels and selecting pixels in one image to add it in the image of another picture. I showed them how to feather selections to make them more pleasing to the eye. I even offered to show them how to add hair on the head of a less fortunate individual but we didn’t have a picture of the back of my head, so we skipped over that.
Then I took them to Big Huge Labs http://bighugelabs.com/ to show some of the many possible projects they can create using their photographs. We started with creating a motivational poster and had very little time for other possibilities. I enjoyed showing teachers these wonderful resources and hope to do the workshop again sometime.

Thursday, June 16, 2011

Storing the Mobi for the Summer


I just wanted to send this information out to people who have an eInstruction Mobi. Teachers should remove the rechargeable battery from the pen when it is not going to be used for an extended period of time such as the summer. To do this, locate the little square button on the back of the pen just above the 2 silver rings. Use a key or something to press the button in a bit. Slide the pen apart and you will expose the battery. Take the battery out and store it in a place that you will remember, at room temperature. To place the two pen halves back together, align the inside ridges in the top half of the pen with the slot in the bottom front half of the pen and slide them together until you hear the pen click.

When school starts again in the fall, open the pen and insert the battery with the positive icon facing towards the tip of the pen. Charge the Mobi and the pen for a full 12 hours before using it.

It’s also a good idea to remove the Mobi rechargeable battery as well when not using it for an extended period of time. To do this, turn the Mobi over and use a small Phillips head screwdriver to remove the screw. The rest is easy.

NCVPS Blackboard Upgrade Compatibility Issues


North Carolina Virtual Public School has updated the Blackboard system they use to 9.1. However, they have learned of a few incompatibility issues. These issues occur when students use Internet Explorer versions 7, 8 and 9. Students will experience issues with content not being viewable, not being able to participate in assessments, or uploading assignment files into the system. Internet Explorer can be modified to be more compatible by using IE in the compatibility mode. However, the best suited browser for Blackboard 9.1 is Mozilla Firefox 3.6 or higher. Make sure your versions of Flash and Java are up to date. Also make sure your browser history and internet cache is cleared prior to the logging into Blackboard. Depending on your version of Internet Explorer, follow the list of instructions I have out lined below.

Setting IE to work in the compatibility mode.
  • Open Internet Explore and log into Blackboard.
  • Click the tools menu option at the top of the page.
  • Select the "compatibility view" option from the "tools" drop-down menu.
  • Allow the page to reload.

Clearing the internet browser history and cache.
  • Go to the "tools" drop-down menu.
  • Select "delete browsing history."
  • Click “delete all”.
  • Check “also delete files and settings stored by add-ons” and click yes.

Thursday, June 9, 2011

Replacing The KWIK Mobi Battery & the Mobi Pen Battery

Some of you have had your Mobi now for a couple of years so at some point, if you haven’t already done so, the batteries will have to be replaced. There are two batteries that will eventually need to be replaced. The Mobi pen battery is $4.00 from eInstruction and the part number is IW-A-629-039-000. It's a GP (Gold Peak) 1.2 volt battery. To get to the battery, locate the square little button on the back of the pen just above the 2 silver rings. Use a key or something to press the button in a little. Slide the pen apart and you will see the battery. I have also found that if your pen is not working and you have definitely charged it, you might just need to take this battery out and use a pencil eraser to clean the contacts. When you are charging the Mobi and the pen, be sure you see the little pen charging icon. This is a little square with a line at an angle through the top. If you do not see the little square constantly filling and emptying, then the pen is not being charged. It is very possible to charge the Mobi and not charge the pen. You may just have to push the pen down all the way into the pen slot of the Mobi. You also may just have to turn the pen around a bit in the slot. In any case, be sure you see that the pen charging icon is displayed.


The KWIK Mobi also has a battery of course and eInstruction charges $35.00 for it. The part number is CB-A-629-038-000. eInstuction also charges $5.00 for shipping and handling. The KWIK Mobi battery is accessed from the back. Use a small Phillips head screwdriver to remove the screw and then you can remove the battery cover. It is a rectangular shaped lithium-ion 3.7 volt battery. Just be sure that the gold color contacts are facing towards the upper left corner when placing it back in the battery compartment. Again, be sure you see the Mobi battery icon constantly filling and emptying when you are charging it.

Thursday, June 2, 2011

Big Huge Labs Offers Over 40 Ways to Manipulate Your Images


http://bighugelabs.com/ is a great site for turning your photos into creative works of art in a wide variety of ways. Perhaps you would like to create a motivational poster out of your image. Perhaps you see yourself on a magazine cover. You can do that here. Maybe you want to turn your picture into a puzzle or a photo collage using a style the artist, David Hockney uses. You can add comic book style captions to your pictures, create a mosaic from any number of pictures, create a movie poster from your favorite image, create a strip of photobooth pictures, create and print a pocket sized photo album, add a museum style mat to your pictures, make your own ID badge or Press Pass, create monthly calendars from your digital images, create stamps or choose from more than 20 different frames to spice up your image and a multitude of other effects. Are you musically inclined? Perhaps you would like to create your own CD cover. Maybe you have something big to say and you need to put it on a billboard. This would be the place. Do you feel the need to make a slide show? Big Huge Labs has an app for that. There are over 40 ways to manipulate your images on this site. The site is offers it’s services for free. Educators can sign up for an account and receive ad free services. Educators can also pre-register students so that they can sign in without requiring an email address. There are other perks for educators as well. So enjoy the site and let your creative side run wild.

Thursday, May 5, 2011

Can Podcasting Be Used More In The Classroom?


Podcasting is one of those things I feel is underutilized in the classroom. It is a fun and effective way for students and teachers to produce creative projects or broadcast information. There are so many reasons teachers can use it with their students or as part of their instruction. I created a “Podcasting Using Audacity” course in Moodle that teachers take. Teachers from many different grade levels and subjects have taken the class and continue to do so. I enjoy reading their posts in the forums. Here are some of their comments about using Audacity in their class. I hope to see it used even more in the classroom.
Audacity is free and an awesome digital audio editing tool.
“There are so many great ways podcasts could be used. I worry about the availability of headsets, but I'm sure there is a way around that. Student projects could be greatly improved. Students could narrate their power point presentations. It would be particularly good for students who are shy in front of the class. I once had a student dissolve into tears as she attempted a recitation from Macbeth. I wish I had had access to this when she was here.”

“I also think students could use this to liven up presentations of their own writing or recitations from literature. It could lead to a really interesting discussion of tone. Using their musical selection to help set up the discussion.”

“Thanks for opening this door!”

“I could post a podcast on my website to explain assignments or give a broad overview of a unit or even the course.”

“I think it could be useful for students to use for projects. Particularly when we do plays, students could create their own podcasts of scenes from plays.”

“It would also be useful when I am absent. I could create a podcast for the substitute to play which would give me more control when I am out of the classroom.”

“I could put podcasts explaining typical homework issues or short lessons. Students could then access my voice, using the teaching methods and vocabulary that they are used to, at home if they have questions about concepts.”

“I could also have students create podcasts that explain concepts. We could use this as a review before the EOC--divide them into groups and have them become experts on one particular standard/goal. That way, each review would be posted on the webpage and students could access information on each when working practice problems and studying for exams.”

“Because creating a podcast requires practice and several takes I think it's also a way to expose students to public speaking without the fear of a live audience. As they become comfortable with podcasts they can build the confidence needed to speak in front a group.”

“I think podcasting is an excellent way for students to demonstrate knowledge of a topic.”

“I can see using Audacity several ways. From an instructional standpoint I could create podcasts or with instructions for self-paced lessons or post podcasts on my website for students to use when working on assignments or projects at home.”

“From a learning standpoint, I could have my students use audacity to create their own podcasts to use for peer teaching or as an addition to class blogs. Currently I'm having my students create short videos and they could use Audacity to create a track for voice-overs as part of their projects.”

“In high school math, I can use audacity to have explanations on my website. I can also have students work in pairs to do mini-radio broadcasts explaining how to solve different kinds of problems. The idea of leaving directions for a substitute is a great one, too.”

“In parent communication, I like using audacity to create messages for parents and to have engaging audio (in comparison to the Alert Now messages) on various topics.”

“This training has taught me a lot and has given me different ways to communicate with my students.”

“I can't wait to use Audacity with my class.”

“I think that students will be more engaged and will work harder to produce quality work knowing that anyone can listen to their voice.”

“I think it would be great to have explanations of how to solve different problems. I also think that students could create explanations in a student tutorial space.”

“I also saw the Donors Choose idea of getting headsets for my class. Great Ideas!!!”

“I would use audacity to help me explain lessons that I teach repeatedly. It would save my voice. Students would also be more receptive to hearing my directions with music. This would be a great tool to create instructions that I could leave for substitute teachers. The directions would be easy to follow.”

Wednesday, May 4, 2011

Workspace Memory Errors


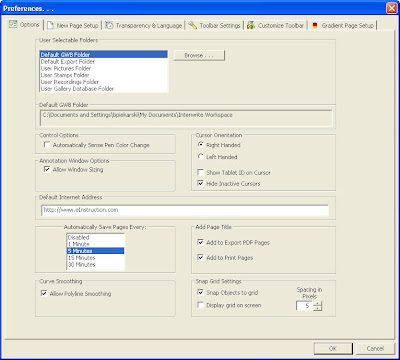
I’m writing this blog because a few teachers have come across this error message when using Interwrite Workspace. It’s a memory error and it looks like this: “disk full while accessing user\Interwrite Workspace\IW Autosave.GWB”. The reason the teacher is receiving this message is because their H drive is full. By default Workspace auto saves the workbook every 5 minutes. If the teacher’s H drive is full, the program has no place to save the file. There are a couple of things you can do. First of all, I would ask the teacher to clean out their H drive. That should probably be done anyway. The second thing is to open the Workspace program, click on the small triangle in the top of the main toolbox to bring down the menu and choose preferences. In the options tab, you will see the auto save section near the bottom of the preferences window. The default is to auto save every 5 minutes. However, you can disable it and solve your memory error. Of course you would need to save the workbook to a location of your choice. The 3rd option is to create a folder on your C drive and set that folder as the “GWB Folder”. Workspace will auto save there and you won’t have the memory errors anymore. Create the folder on your C drive first. Open preferences and the “options tab”. Be sure the “default GWB folder” is selected. Click browse, navigate to the folder you created on the C drive to save the Workspace files and select it. Then click ok to close the preferences window.

Thursday, April 28, 2011

Displaying the Smart Board Floating Tools


The other day a co-worker asked me how to bring back the Smart Board floating tools. These are the tools that are displayed vertically on the left or right side of your desktop. Normally you would click the Smart Board icon in the system tray located in the lower right corner of your desktop and choose “show floating tools”. The problem was that there was no Smart Board icon in the system tray. Let me also say that looking for the information in Google was of little help. Perhaps I did not type in the right key words in the search panel, I don’t know. Anyway, here is what you need to do to bring back the Smart Board icon in the system tray. Open “my computer”, c drive, program files, Smart Technologies and the Smart Board Drivers folder. Locate the Smart Board Tools exe and double click it. This will place the Smart Board icon in the system tray and you will be able to click it and choose “show floating tools”. I hope this helps someone.

Tuesday, April 26, 2011

Creating A CPS Challenge Board

A CPS Challenge Board is very similar looking to the Jeopardy game. In order to create a Challenge Board, you must use questions that you have already created in lessons or questions that you have imported from ExamView. After you have chosen which questions and categories you want to use, the next step is to create the Challenge Board. Click the prepare tab and the team activities sub tab. Now click new. Type a title for your activity and a title for each category. Once you click ok, a Challenge Board window opens that includes your database in the upper left portion of the window, your categories and the point values in the upper right and the questions in the lessons (once selected) in the bottom. Click the plus sign next to the name of your database to see the lessons (we call them tests). Click on a lesson to see the questions displayed in the bottom half of the Challenge Board window. Just drag and drop the questions to the point value buttons in each category. You can have more than one question in one point value. So for example, you can add 5 questions to the 50 point value button for the North Carolina category. The number of questions you drop into a point value is completely up to you of course. Each button under the category contains 2 numbers. The first number is the point value. The second number represents the number of questions you dropped into that point value.


To engage the Challenge Board activity, click on the engage tab and the team activities sub tab. Click on the name of your Challenge Board and click the engage button. Choose your class from the dropdown in the window that appears and click start. Click on a point value in a category of your choice and the question will appear on your screen. Click start and let the competition begin. Once the students or teams have entered their answers click the close button on the question window to return to the Challenge Board. Continue clicking the point values in the categories until the students or teams have finished all the questions in the Challenge Board. Choose “show score” from the settings menu to see the score. It is displayed in the middle of the Challenge Board. If you want to break your class up into teams you will have to create a separate team class and create students called for example, team 1, team 2, etc.
Don’t forget that you can also set the timer to auto start once a question is started. You can do this in the Challenge Board by clicking the options menu and checking “auto start the timer”. For that matter, you can also auto start the question in the same manner.

Monday, April 25, 2011

Explore the Universe With The World Wide Telescope


I wanted to revisit the World Wide Telescope by Microsoft because it is such an amazing resource. I wrote a blog about the WWT when it first came out back on May 23rd of 2008. The high resolution images are captured from the Hubble Space Telescope, Chandra X-Ray Observatory, Spitzer Space Telescope and other image capturing devices using different wavelengths such as the visual spectrum we see, infrared, x-ray and others. The combined images allow you to use your computer as a virtual telescope and in essence a web browser for the universe. Once opened, you can click on any of the collections along the top. The choices available are constellations, our solar system, Hubble, Chandra or Spitzer images and other collections. There is a drop down in the lower left area for viewing images of Earth, the planets, the sky or panoramas. Another drop down to the right of that are choices within your selection. So for example if you choose Earth from the left drop down, you can choose Earth at night, Earth aerial or other options.
Once you’ve made your selection, you can zoom in or out by scrolling the mouse wheel, press and hold the left mouse button to drag your field of view or right click an object to see information about it.
Several menus are along the top. Click on “Guided Tours” to choose from 16 folders. Each folder includes several video tours of nebulas, galaxies, planets, black holes, supernovas, star clusters and other interesting objects in the space around us. These videos are very enjoyable. Click on “Community” to access and join up to three different star gazing and space exploration communities.
Another incredible option is the ability to connect and control your telescope from the WWT program. You can either download the WWT program on your home computer or run the web client http://www.worldwidetelescope.org/help/SupportHelp.aspx. Both are free and well worth the time spent exploring the universe. Microsoft also has a program called WWT Mars.
I would like to continue telling you about this wonderful resource but I feel the need to explore. So sit back, buckle up, warp into space and enjoy the ride as you explore the universe from the comfort of your computer. Star Trek uniforms are optional. Live long and warp speed.

Sign eInstruction's Pledge To Go Paperless On Earth Day

If you sign eInstruction's pledge to go paperless on Earth Day, you will be entered to win a Pulse CPS classroom set http://forms.einstruction.com/forms/earthday?redirect_src=/pledge. If you use the CPS in your classroom, you will never have to use paper to make copies of the tests for your students again. Nor will you have to create answer sheets or use the costly Scantron sheets. You can have the students answer each question together or let them take the test at their own pace. You can also create multiple versions of the same test. One of the best features of CPS is that the test is graded as soon as the last student finishes their test. CPS is not solely used for taking tests. It can be used to review before a test or to review after the test. The Classroom Performance System can be used to get a sense of how the students feel about a topic that is being discussed in the class. The structure of learning is pyramid in nature. In other words, if students don't understand what they learned today, they will be lost in tomorrow's lesson. Asking the students if they have any questions about what they learned today, will most likely not reveal the true nature of what they don’t understand. The CPS can be used very effectively to accurately know if they are ready to move on or not. This can be done by having them answer 10 questions or so. If the questions are not graded, there is no pressure and their answers will be honest. Another way to involve your students in the learning is to create a Challenge Board in CPS. It is similar to a Jeopardy Game. You can break your class into teams and bring out their competitive nature. Save a tree and help reduce the paper budget but more importantly have fun and make your assessments be more effective.

The winner will be notified by email on April 21st.

NCVPS OCS Blended Learning Courses

Here is a wonderful opportunity for your OCS students. NCVPS offers 5 courses: OCS English 1, OCS English 2, OCS Algebra 1, OCS Biology and OCS Applied Science. The NCVPS teacher works very closely with your face 2 face OCS teacher in these courses. The EC teacher drives the instruction, owns the grade and enters it into NC Wise. The NCVPS teacher supplies the course content which follows the essential standards. The course content was created by classroom teachers from across the state, course content experts, and OCS & EC teachers. The courses focus on engagement and interaction for the visual, auditory etc type of student. The NCVPS teacher differentiates and individualizes the curriculum based on the needs of the students. Each course is created just for the EC teacher and their students in that specific school. Before a school registers students, the school and the OCS teacher should be willing to teach the courses in the Blended Learning environment.

Counties from all over the state are involved in these courses. If you decide to enroll students in these courses, you would need to complete a short online survey in which they ask you the course you want, estimated number of students and the face 2 face teacher that will be involved.
All OCS f2f teachers will need to go through an approximate two hour online training prior to the Fall semester start on August 25, 2011. Teachers will be able to decide when they want to complete the training but all f2f teachers will need to complete this training prior to the start of Fall semester. The training will be available by May 15.
The NCVPS OCS Blending Learning courses require a true co-teaching experience where the f2f teacher is driving the instructional decisions while working daily with the NCVPS content teacher. The NCVPS teacher will help the classroom teacher individualize and differentiate the instruction for each student but the NCVPS teacher does not deliver the instruction real time to the students. The f2f teacher does this but they will have planned using the online content, the teachers own resources, and the NCVPS teacher to determine the best way to teach the content to the students.
This partner teaching is the most critical piece for schools to understand. The NCVPS teacher will not be providing daily direct instruction; this responsibility rests with the classroom OCS teacher. The online content provides archived teaching sessions that can be used, but the daily instructional decisions are driven by the classroom teacher who plans daily, through an asynchronous document, with her partner NCVPS teacher
Distance Learning Advisors may enroll students into the OCS Blended Learning courses starting on April 5th. The DLA's will see the five courses listed in the registrations system, beginning with the OCS prefix. DLA’s will then register students into the course. At this time, the school DLA will not see a specific section for his or her school. DLA's will only see OCSBlendedAlgebraI, OCSBlendedEnglishI, etc. Eventually, in the registration system, NCVPS will break out the school by course so that it will be the course will be identified with your school name in the title such as this: OCSBlendedDistrictSchoolOCSCourseName. DLA's will only see these sections once registration closes and closer to the start of the Fall semester. DLA's will be asked to provide the name of the OCS classroom teacher for each course before August 2011. DLA's will be contacted by email in order to provide this information. The five course sections (OCS English I, OCS English II, OCS Algebra I, OCS Biology, and OCS Applied Science) will remain open until all the available seats are taken.
If you have any questions about the NCVPS OCS Blended Learning program, please contact Michelle Lourcey (michelle.lourcey@ncpublicschools.gov) Curriculum and Instruction Division Director.

Working With Textblocks In Interwrite Workspace

When working with text blocks in Interwrite Workspace I noticed that the length of the text lines were fixed to a short length. This happens whether or not you type the text or paste it in. I called eInsrtuction to ask if there was something obvious I was missing. The eInstruction representative noted the problem but did not have a solution. By playing around I found how to increase the width of the text block. Double click the text block if you are not in the text edit mode. Place your cursor on the right side of the text block. The arrow will change into a short left/right arrow. Drag the text box to the right to make it the desired width. This alone will not make the text box wider. You have to then click the right edge of the text box to make the text box stretch to that width.

The icons in the textblock window starting from the left are clone text, split sentence into words, change color, font name, font size, bold, italic, underline, left justify, center justify, right justify, bullet list and the onscreen keyboard.


I hope this helps someone.

Updating the Firmware On the eInstruction Pulse Remotes


There have been firmware updates to the RF receiver for the Mobi wireless tablet and firmware updates for the Mobi tablet itself. There also have been firmware updates for the CPS Pulse RF receiver. The Pulse remotes also have firmware updates. That is what this blog is about. This update allows a user to enter more than 20 characters to answer an essay question in CPS using the Pulse remotes. The process is relatively fast unless you have many sets to update. The first step is to see if you need to update the firware on the remotes you have. You can find out what version you are running on your remotes by pressing the menu button (located at the top of the remote), then press the right arrow key six times until you see “diagnostic”, then press send (the key below the menu button). The old version firmware on the remotes is 00.47. The new version is 00.54.

Ok, here is the update process. First of course make sure you have the RF receiver plugged in the USB port of your computer and turn on all the remotes. Also, make sure that the RF receiver and the Pulse remotes are on the same channel. Click on the eInstruction icon in the system tray and choose “eInstruction Device Manager”. Right click on the icon for the Pulse RF receiver and choose “properties”. Press the control and shift keys at the same time. You will see two more tabs appear, “update keypads” and “update base”. If you haven’t updated the firmware on your RF receiver, click the “update base” tab and update the RF receiver. Click the “update keypads” tab to update the firmware on the remotes. Click “browse”, select the 0.54 folder and click “open”. Select “English Pulsestring” and click “open”. Click “update”.

You will see a message “You are about to upload new firmware to your Pulse keypads. Do not remove the USB receiver during this process. If you are sure you want to continue, select ok, otherwise choose cancel to abort the update.”

The next step is: “Manually join all CPS Pulse clickers to channel 21 by pressing digits 21 (your channel may be different) on each clicker and then pressing send. When all clickers have joined, press ok.”

The next message displayed is: “The firmware update is currently being sent to all CPS Pulse clickers. The clicker LCD may display blank during the update, please wait until all clickers read powering down and have powered off completely and then press ok to continue.”

The last message you will see is: “The CPS Pulse firmware has been successfully updated. Press ok to end the update process.”

I hope that helps. Thanks.

Creating Video with Sound on the Lumens DC 166 Document Camera


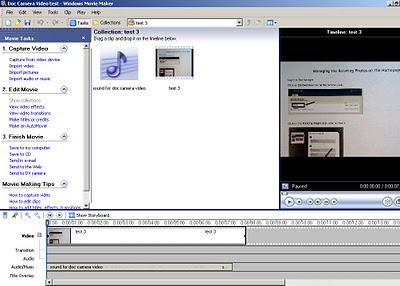
It’s relatively simple to create a video file using the Lumens DC 166 document camera. It’s not as easy to create a video file that includes sound. So here is the way I did it. The first step is to click the video record button in the Ladibug software. You have to click the advanced button to see the video button. I do it this way so that I can choose where to save the file. I don’t want to save the video file on the hard drive of the video camera. The video is saved as an avi file. The next step is to open the video in a minimized window. This will open in Windows Media Player. I moved it the bottom half of my computer screen. I plugged in my headset (microphone/headphone combination) and double clicked the sound icon in the system tray to make sure my speaker and microphone was not muted. I opened Audacity. I played the video from the document camera and narrated the video while I recorded my voice in Audacity. Audacity has many options to edit the sound recording so it’s ok if you make a mistake. When I was happy with my sound recording, I exported it as a wav file. Then I opened Windows Movie Maker. I’m only going this option because Movie Maker is free. It wouldn’t be my number one choice, but that’s ok. Import your video file and your audio file into Movie Maker. Make sure you switch to the timeline mode of Movie Maker. Drag your video file to the video area of the timeline and the audio file to the audio/music area of the timeline. Save the project. You don’t have very many video editing options in Movie Maker. You can only cut part of the beginning or the end but keep in mind it is a free program. You would have a lot more options if you used Adobe Premiere Elements but that would run you about $50.00. The last thing you need to do in Movie Maker is to save the file so that it can be played on any computer. The file is saved as a wmv file and can be played in Windows Media Player. If you are going to record your lessons and place them on your website be sure to break up the video files so that they are not so memory intensive.

Interwrite Workspace Layers and The Right Click Tool Boxes


Let's take a look at the layers in the Interwrite Workspace program. You can have up to six layers on one page. You can also rename the layers by clicking on the edit layer icon (page icon with the pencil below layer one). One way to use layers is to have an image with items you want the students to identify on layer one for example. You could then create another layer where students would be able to write their answers. This could be layer two. The third layer would have the answers already typed out and in the right places. This layer would be hidden at the start which is easily done by clicking the green check mark to the right of the layer name. After the students write their answers, hide that layer and make your layer with your answers visible.


You could use layers to show before and after pictures. For example you could use the camera tool to grab before and after images of New Orleans from Google Earth (use the history slider). Place the images (centers aligned) on different layers. Click the green check to hide and reveal the past and present images.

Did you also know that you can right click on any object on the Workspace page to bring up the action and tools toolboxes? The actions toolbox has undo, redo, cut, copy, paste, select all, order selected entities, rotate selected entities, group (if you select more than one object), ungroup, move to background, export entities, and add files to gallery. The tools toolbox by default has the selection tool, the pen tool, freehand shape, freehand text, multi colored pen, picture pen, highlighter, eraser, type text tool, shapes, line, stamper, zoom, undo, redo, clear tool and the mouse mode. If you chose “preferences” from the menu and click on the “customize toolbar” tab you can drag and drop the tools you want in the tools toolbox. You can also remove tools you don’t want to appear in the tools toolbox by dragging them out. You will have to name and save the scheme.

Many teachers create and use PowerPoint presentations in their everyday teaching. While in Workspace you can choose file “open” to open a 2003 or 2007 PowerPoint presentation. Each slide in the PowerPoint becomes a page in the Workspace file. Separate objects on the PowerPoint slides are separate objects on the Workspace pages and can be moved or manipulated as such. You can also open PDF’s in the Workspace software so that they become Workspace pages as well. Of course your original PowerPoint and PDF files remain unchanged. If you create a Workspace presentation, you can also export (from the file menu) the Workspace file as a PowerPoint, PDF, JPEG, Bitmap, GIF, TIFF, PNG file or as HTML.

I hope this helps you use the Workspace software more effectively in your lessons.

Skype Lunch & Learn


These are both exiting and crazy times we live and work in today. As a District Instructional Technologist, I travel to many Middle and High Schools to help and train teachers how to use and integrate technology into their curriculum. However, there are times when the attendance in these trainings is low. Teachers have a lot on their plate too and they may have other jobs to go to or children to attend to. Being that the economy is not doing all that well, I wondered what would be an effective way to reach the teachers and help them learn new ways to involve students in their lessons. The answer I came up with is to Skype the teachers during their lunch period, although it does not have to be during their lunch time. It could be arranged during any time that they are free. Skype allows you to share your computer screen. This would allow me to show the teachers how to do things and talk them through it step by step. Another possibility could be that teachers could setup office hours for their students. This is what I want to setup with my schools to reach more teachers and help them understand the many ways they can involve the students in their lessons.

Combining Gen 2 and Gen 2 Pulse Remotes Together


Some schools have different versions of the CPS system. If your school has Generation 2 CPS remotes (shown here on the left) and Generation 2 Pulse CPS remotes (shown here on the right) , you can combine them to use with a large group of people. You are only going to use one RF receiver. Now you might think that you would use the newer Pulse RF receiver, but no. Plug in the Generation 2 RF receiver in the USB drive of your computer to receive the signals from the remotes. The next thing you will have to do is change the channel and the clicker # of the Pulse remotes. Plug the Generation 2 RF receiver in the computer. Wait for a few minutes to let the computer and the Device Manager recognize the RF receiver. Click on the Device Manager in the system tray and choose eInstruction Device Manager. Right click on the icon for the CPS Generation 2 and choose properties. The base channel the RF receiver is using will be listed on the general tab in the lower left portion of the window. Write this down. Now you will have to turn on every Pulse remote and change the channel and clicker number. To do this, press the left and right arrow keys together, and immediately press the + - sign button. Enter the new channel number and press the return key, enter the new clicker number (33 instead of 1 for example) and press return twice. This will turn the remote off and store the new information. It is a good idea to tape a piece of masking tape on the top of the remote with the new remote number so that you can keep track of them. I hope this helps someone.

Application Failed To Initialize Properly 135 Error When Opening The Workspace Software


Have you ever loaded the latest version of the Interwrite Workspace software or CPS and received a "Application Failed To Initialize Properly 135" error when you tried to open it? The only thing you can do is click ok to terminate the program. This happened to me when I was out at a school and I wanted to pass this along to help others out. To solve this problem, I installed the "Microsoft.Net Framework 3.5". In our district, it can be loaded through the AICP. The program opened up and worked fine after that.

When you shutdown your computer, you sometimes see an option to "install updates and shutdown". You should choose this option. If you just choose shutdown, you may miss those important updates. This may happen more often than you think. I hope this helps.

Battery for the Mobi


I just wanted to share a few pieces of information about the Mobi. First of all if you need a battery for the Mobi pen, you can buy it at Radio Shack for $5.99. Their catalog number is 55027736. It's a GP (Gold Peak) 1.2 volt battery. To get to the battery, locate the square little button on the back of the pen just above the 2 silver rings. Use a key or something to press the button in a little. Slide the pen apart and you will see the battery. I have also found that if your pen is not working and you have definitely charged it, you might just need to take this battery out and use a pencil eraser to clean the contacts. When you are charging the Mobi and the pen, be sure you see the little pen charging icon. This is a little square with a line at an angle through the top. If you do not see the little square constantly filling and emptying, then the pen is not being charged. It is very possible to charge the Mobi and not charge the pen. You may just have to push the pen down all the way into the pen slot of the Mobi. You also may just have to turn the pen around a bit in the slot. In any case, be sure you see that the pen charging icon is displayed. I have also noticed that leaving the Mobi in your car (in the cold) the day before you want to use it is not a good idea. I did this the day before I went to a school to do a training and the fully charged Mobi and pen did not work the next day. I hope this helps.

Picnik, An Online Photo Editing Site by Google

It seems like people are always looking for a way to edit their photos. There are a number of places you can use or go to but here is another one for you to check out. It’s online so there is nothing for you to download. It works on a Mac, Windows or Linux. The free version gives you the ability to do a wide variety of things. Some of the options are not available in the free version. They require a fee of $24.95/year.


After you create an account or log in, you will see the button to upload a photo. Once this is done you will be on the edit tab. In the edit tab you have the options to auto-fix the image, rotate, crop, resize, sharpen, adjust the exposure or the colors and remove red-eye. The other tabs along the top are library, create, save & share. The library tab gives you the option to upload more images from your computer, create a show, view photos you have uploaded in the past, enter a URL to upload the image, choose images from your Picasa Web Albums, open and save images from Flikr and a number of other places. The create tab gives you the option to apply a number of effects. Most of them are available although a few require the premium version. There are featured effects available, the option to add text to the image, touch up options, several frames available, some advanced features are available in the free version and some seasonal option as well. The last tab along the top is the save & share tab. This tab gives you the option to save the edited image to your computer, email your image, print your photos from Qoop or from your printer or share it in a number of other places. So as you can see there are a multitude of editing options. Check it out.

CPS Items You May Encounter

I have received a number of questions dealing with the following things so I thought I would write a blog about the answers to these questions so that it might help someone. First of all when you open CPS, if your database is on a flash drive or somewhere other than the C drive, you will encounter the following message.


This message is fine. Just click yes to continue through the process of opening your database. If you click cancel, you will exit out of CPS. The best thing to do of course is to save your database on the C drive. You can copy your database to a thumb drive to work on it at home. Just overwrite the database to the C drive the next morning.

If you ever want to update the CPS or Workspace software, don’t forget to uninstall CPS, Workspace and the Device Manager in the Control Panel. These new versions are supposed to update without removing the older versions but you still need to remove the old before installing the new.

If you have Smart Board software on your computer and you’re not using it, uninstall it. The Smart Board software takes up the unused ports on your computer. This prevents your CPS RF receiver from being detected by the Device Manager. eInstruction emailed a site to me to download a program that clears a port for the receiver. The website is: http://www.ftdichip.com/Drivers/VCP.htm. I downloaded the 2.08.02 file to clear a port. Restart your computer and plug in the CPS receiver before the computer starts up.

When you want to give the students a test, select the “engage” tab and the “lessons & assessments” sub tab. You need to put a check in the box next to the test you want to give your students. Then click the engage button to give the test in the teacher lead mode. However, if you have the generation 2 or the generation 2 Pulse remotes, you also have the option of giving the test using the student paced mode. I think I discussed these modes in an earlier blog. If you want to give two or more versions of the same test, place checks in the boxes to the left of the tests and click engage. I think I blogged about this earlier too.

I hope this helps you out. Thanks for reading the blog if you made it this far. If you stopped at the title, I understand.

Updating the Firmware of Your Mobi RF Receiver and the Mobi Wireless Tablet Manually

In order to update the firmware of the Mobi, you have to go about it a bit differently than is posted on the eInstruction website. They will tell you this process if you call their Tech Support number. eInstruction is a very good company. There are two hex files they will email you with instructions that are similar to the steps I have listed here. This is a more detailed list of the steps needed to complete the manual update of the Mobi receiver and the Mobi tablet itself. The steps are not long or complicated but they should be done in order to have a good connection between the Mobi and the receiver.

Ok, here you go. Proceed as follows:

1.) Open the eInstruction Device Manager.

2.) Plug in the Mobi RF receiver.

3.) Right click on the Mobi icon in the Device Manager and choose properties.

4.) Press the shift and control keys at the same time.

5.) Click on the update Mobi tab that appears.

6.) Click browse and open the hex file that ends with D.

7.) Update the firmware.

8.) The Mobi will restart automatically.

9.) Remove the RF receiver and connect the Mobi to the computer using the USB cord.

10.) Now repeat steps 3-8, except browse and open the hex file that ends in F.

You will need to call eInstruction Technical Support 888-333-4988 to ask for the 2 hex files. They will email them to you.

Updating Your Pulse RF Receiver Firmware

If you are using eInstruction’s CPS Pulse in your classroom, you will need to update the firmware on the RF receiver. That’s the thumb drive looking item you plug into the USB port of your computer. It’s used to communicate to the CPS. If you also use the Mobi on the same computer, it would be a good idea to plug them each directly into one of the computers USB ports. You shouldn’t plug them both into a USB multiport mini hub. By doing this, both receivers will compete with each other. Also, keep in mind, signal strength is lost with the additional wire length. An analogy I use in my trainings is, “Imagine hooking up multiple T connectors to a water hose. The water pressure at one of the hose ends will not have anywhere near the pressure as the original hose end.” I also wanted to let you know that there are updates to the Workspace Mobi (8.84.0001), (CPS 6.59.0018) and CPS for PowerPoint (6.59.0018) programs. They were new in October. The update mainly occurs in the Device Manager but since this is the software that connects the RF receivers to the devices, it’s a good idea to do these updates.

Ok, enough of the rambling. Although I hope you found it useful. Here is the process of updating your Pulse and Mobi firmware.
1.) Open the Device Manager and plug in the receiver you are going to update.


2.) Select the appropriate receiver in Device Manager, and go to file and preferences.


3.) This will open up a dialog box , choose the firmware update tab. Click “check for updates”.


4.) You will be told firmware updates are available. Click ok.

5.) Click next on the confirmation screen, and you will see a list of firmware updates for your device.

6.) If the current version is the same as the available version, choose cancel. Otherwise continue.

7.) Check the box in the device column. Click update, and then click ok on the confirmation screen. A progress screen will open.


8.) When the process completes, the following screen will display with the message “firmware update complete”.

9.) Click finish.

10.) Unplug the receiver.

11.) If you have another receiver to update, return to step 1 and start the process again with the next RF adapter.

Note: If you have plugged in multiple RF receivers, it's a good idea to open the Device Manager and right click on the devices you no longer have plugged in and choose remove.