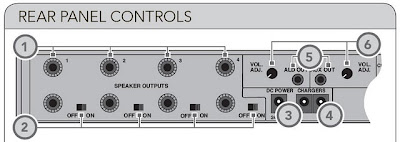
If you have used the document camera in your classroom you know what an invaluable piece of equipment it is. It offers you the capability to zoom in on flat or 3 dimensional objects so that someone in Kansas could see what you are talking about. The document camera can even be turned up to show the students in the class. Of course you are going to have to rotate the image so that they are not hanging from the ceiling. You also have the ability to freeze images and capture them for current and subsequent viewing purposes. However, what I'm going to tell you in this blog deals with recording video with the document camera and in particular recording the audio with it. All you need is a mini plug to mini plug cord. Radio Shack and other places sell this cord 6 feet in length for $4.00. Of course you probably only need a 3 foot length. The mini plug is the same end as the head phone cord you plug into your ipod or mp3 player. You just need to have the mini plug on both ends. Plug one end into the RS232 port which is the audio port of the document camera. Plug the other end into the ALD out of the Lightspeed 850iR Audio System component (which is #5 in the diagram) and turn the volume all the way up (also shown in the diagram). It's not going to be easy to get to the back of the Lightspeed Control box. It might be easier to unscrew the back of the classroom cart for easier access. Now when you record your video using the document camera you can use the wireless mic to record your voice as well. Remember if you are in the document camera mode, you must insert a SD card and save to it. However, if you are in the computer mode, you can save the video to a place of your choosing such as a thumb drive. Now you have the capability of recording your lessons with amazing visual and audio clarity. Enjoy the technology and remember to involve your students in your lessons.
No comments:
Post a Comment